
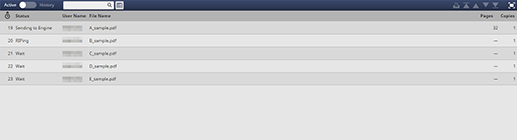
Active Job List
The active jobs are listed.
Item | Description |
|---|---|
| Information of 100 jobs that have been processed recently is displayed in the processed order. This information is displayed in the processed order by default. Clicking the icon switches the ascending and descending orders. |
No. (Job Number) | Displays the number specific to the job. This item is hidden by default. To display this item, click |
Status | Displays the job status with the following character strings and colors: Red: Print Paused, Print Hold by Warning, Number Limit (Waiting), Error Black: RIP Waiting, Receiving, RIPing, Canceling, Printing, Print Waiting, Sending |
Job Type | Displays the job type (print, copy, scan). |
User Name | Displays the user name. |
File Name | Displays the file name. |
Pages | Displays the page count of the original. Inserted blank paper or tab paper without printing is not counted as the number of pages. The number of pages is not displayed for a job without RIP. |
Copies | Displays the number of copies allotted to the job. |
Date Stored | Displays the date and time when the controller accepted the job. |
Output Tray | Displays the output tray allotted to the job. |
Remaining Time | Displays the time period until the job completes. |

Note:
When a secure job is saved and printed, the file name is indicated by an asterisk *.
If HDD full (the free space in memory on this machine is 0%) is detected during job uploading, hold job editing, or page editing, the process is canceled, and Job Status of the active job list is also set to Canceling.
You can right-click on the header item to specify whether to show or hide items. For details, refer to Set List Items.
To adjust the column width, double-click the borderline between items above the header items, or drag the borderline while holding down it. The display width of the column is automatically adjusted according to the longer character strings: the strings of the item name or the strings of the item in the list. The adjusted display width is stored for each connected printer and it is maintained after a restart.
To sort the data by item, click the header of the column. You can switch between ascending order and descending order by clicking.