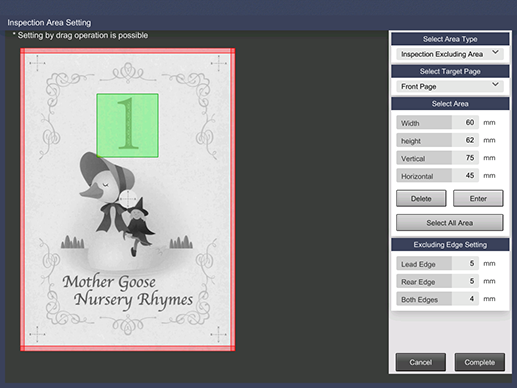
Setting the area that is not targeted for inspection
Specify the area that is not targeted for automatic inspection. This function prevents an unnecessary error from occurring when a part of an image is intentionally changed and output for variable printing, which enhances the inspection efficiency.
Display item | Description |
|---|---|
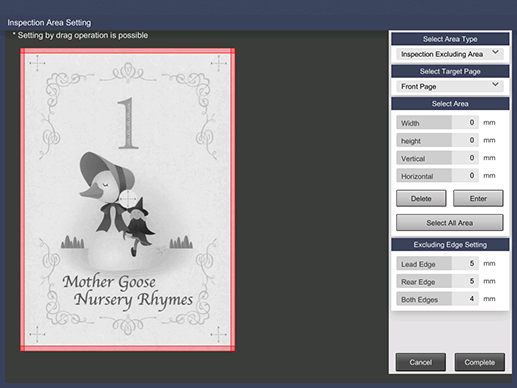
Select Area Type | Select the area type. Selecting Inspection Excluding Area allows you to specify an area that is not targeted for automatic inspection. |
Select Target Page | Select the page that is targeted for automatic inspection. There are three types of pages: Front Page, Back Page, and Select Page, in each of which you can specify a different area. Only one page is specifiable for Select Page. |
Select Area | Specify an area for the page you selected in Select Target Page. You can also drag the desired area to specify it. You can specify up to five areas for a single page. The allowable range is 0 to 488 mm. * If Select All Area is selected, all the target pages are specified as areas. Use this option when specifying the back side for 1-sided printing. |
Excluding Edge Setting | Specify the excluding area at the edge of paper. You can exclude an error detection at the edge of paper. |
Tips
The preview image of this function is displayed in the paper feed direction, not the crosswise direction, as the vertical direction.
Press InspectionAreaSet. on the Reference Image Management screen.
The InspectionAreaSet. screen is displayed.
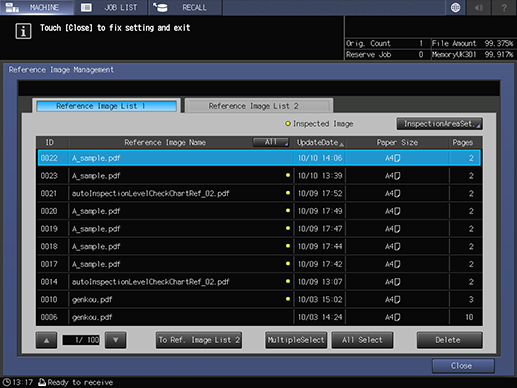
supplementary explanationYou can also select Reference Image Selection - InspectionAreaSet. on the Job Ticket screen to specify the desired area.
Select Inspection Excluding Area from the menu list of Select Area Type.

Select the target page you want to set the area, from the menu list of Select Target Page.
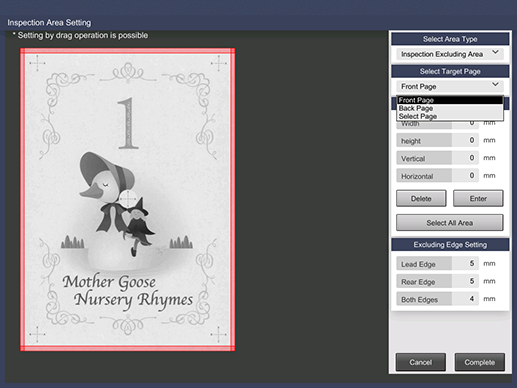
Enter each item in Select Area, and press Enter.
You can also drag the desired area to specify it. You can repeat step 4 to specify up to five areas for each target page.
When reentering the numeric value, select Delete.
Enter the numeric value in each item of Excluding Edge Setting.
Press Complete.
The setting of Automatic Inspection Area is completed.
Tips
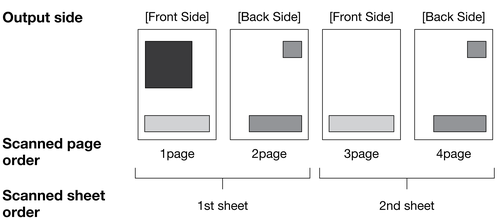
The front page, back page, and specified page that are selected in Select Target Page are ordered as read by Integrated Color Care Unit IQ-501 when a reference image is created.
Setting example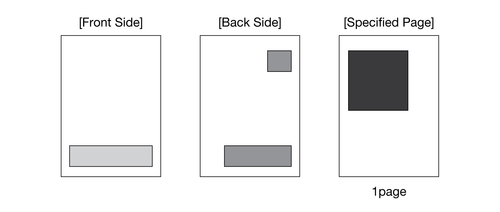
Automatic inspection execution example