
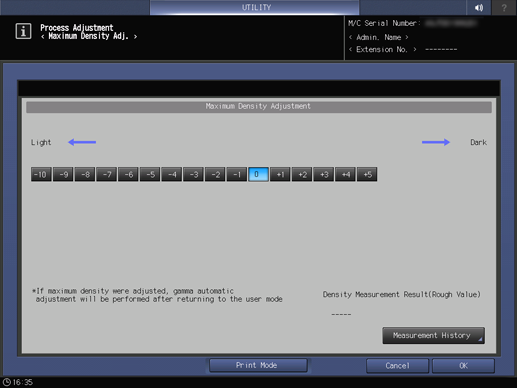
Maximum Density Adjustment
Adjust the maximum density.
Adjustment range: (Light) -10 to +5 (Dark)
This section describes how to make adjustments when this machine is equipped with Relay Unit RU-518 without Integrated Color Care Unit IQ-501.
Tips
The machine will carry out the Gamma Automatic Adjustment after you change the maximum density.
When Integrated Color Care Unit IQ-501 or Relay Unit RU-518 is mounted, we recommend you to first perform Maximum Density Auto Adjustment.
Be sure to perform Color Density Manual Control after changing the maximum density.
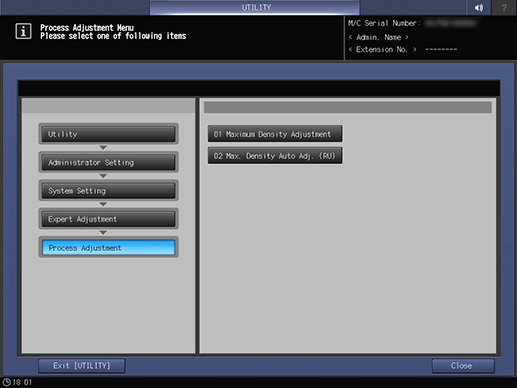
Follow the procedure on Displaying the Administrator Setting Menu Screen to display the Administrator Setting Menu screen.
Press System Setting on the Administrator Setting Menu screen, and then press Expert Adjustment, Process Adjustment, and Maximum Density Adjustment in sequence.
Press Print Mode.
Select the paper tray used for adjustment, then press Start on the control panel.
Charts with screen 1 (Dot120 recommended) applied are output.
Charts are processed by colorimetry, and delivered to the output tray.
After outputting the charts, the screen returns to the Maximum Density Adjustment screen and the measurement result is displayed under Density Measurement Result (Rough Value) in the lower right of the screen.
supplementary explanationPress Measurement History to view the measurement history (up to 30 results).
If you press Switch Display on the Maximum Density Measurement History screen, display items are switched (Display 1: Measurement Date and Measurement Value, Display 2: Paper Type and Set Value).
Change the adjustment result depending on the measurement result.
The measurement result is lower than the desired density.: Change the adjustment value to the positive (+) side.
The measurement result is higher than the desired density.: Change the adjustment value to the negative (-) side.
Repeat steps 3 to 6 until the desired result is obtained.
Press OK to complete the setting.
supplementary explanationTo cancel the change, press Cancel.
In either case, the screen returns to the Process Adjustment Menu screen.
NOTICE
If you press Cancel, the maximum density measurement result is not saved.