Finishing in Handouts or Booklet Format
To staple paper ([Staple])
To display:
- [Classic Style]
- [Copy]
- [Finishing]
- [Staple]
- [Finishing]
- [Copy]
Select the binding positions for sheet stapling.
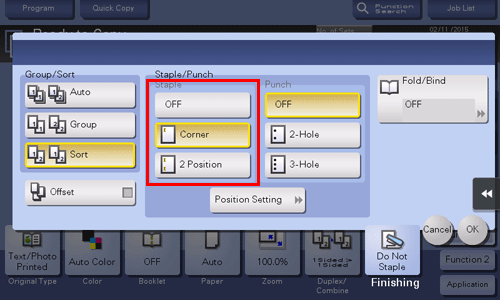
Setting | Description |
|---|---|
[Corner] | Each set of printed sheets is stapled in a corner (top left or top right) before it is output. |
[2 Position] | Each set of printed sheets is stapled at two positions (in the top, left, or right) before it is output. |
[Position Setting] | Select the binding position and original loading direction. If [Auto] is specified for the binding position, the binding position is determined automatically based on the direction of the loaded original. |

To use this function, an option is required. For details on the required option, refer to Here.
To add a margin ([Page Margin])
To display:
- [Classic Style]
- [Copy]
- [Application]
- [Layout]
- [Page Margin]
- [Layout]
- [Application]
- [Copy]
You can add a margin for binding copied sheets to make copies.
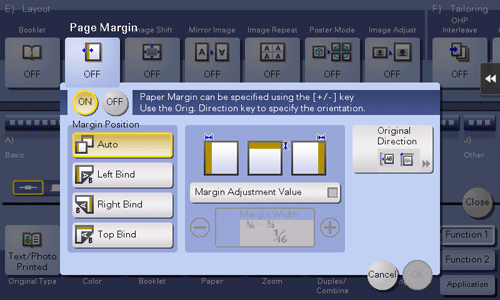
Setting | Description |
|---|---|
[ON]/[OFF] | Select [ON] to specify Binding Margin. |
[Margin Position] | Select the paper binding position.
|
[Margin Adjustment Value] | Select [Margin Adjustment Value], and specify the margin value in [Margin Width]. |
[Original Direction] | Specify the original loading direction so that the vertical direction of the scanned original is set correctly. |
To punch the printed sheets ([Punch])
To display:
- [Classic Style]
- [Copy]
- [Finishing]
- [Punch]
- [Finishing]
- [Copy]
Select binding positions when punching sheets.
The number of punched holes varies depending on the area you are in.
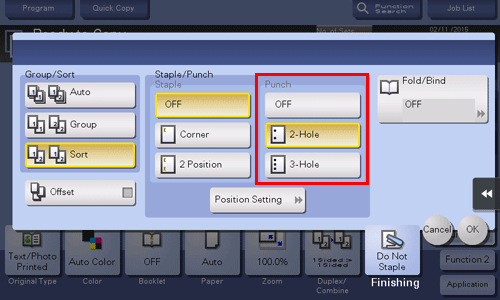
Setting | Description |
|---|---|
[Position Setting] | Select the punch position and original loading direction. If [Auto] is specified for the punch position, the punch position is determined automatically based on the direction of the loaded original. |
To use this function, an option is required. For details on the required option, refer to Here.
To fold paper in the center ([Half-Fold])
To display:
- [Classic Style]
- [Copy]
- [Finishing]
- [Fold/Bind]
- [Half-Fold]
- [Fold/Bind]
- [Finishing]
- [Copy]
Feeds out a copied sheet by folding it in two. Also select the unit by which the paper is folded from [By Copy Job (Multiple Sheets)], [1 Unit], and [By Page]. When you set [By Page], specify the number of pages to be folded at one time.

To use this function, an option is required. For details on the required option, refer to Here.
If Half-Fold is enabled, [Booklet] is set to [ON] automatically.
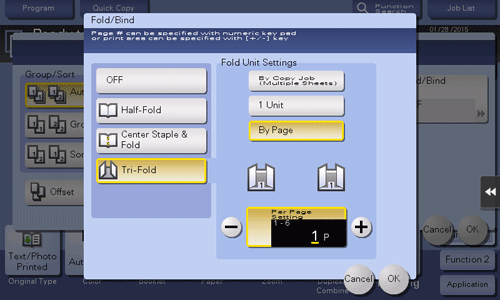
To fold paper in three ([Tri-Fold])
To display:
- [Classic Style]
- [Copy]
- [Finishing]
- [Fold/Bind]
- [Tri-Fold]
- [Fold/Bind]
- [Finishing]
- [Copy]
Folds copied sheets in three before feeding out. Also select the unit by which the paper is folded from [By Copy Job (Multiple Sheets)], [1 Unit], and [By Page]. When you set [By Page], specify the number of pages to be folded at one time.
To use this function, an option is required. For details on the required option, refer to Here.
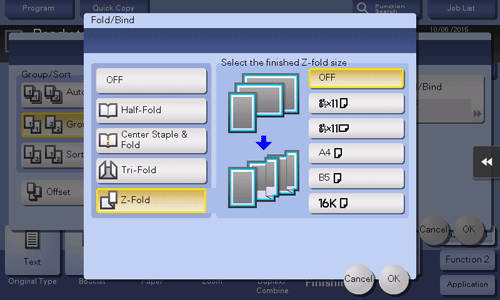
To Z-fold paper ([Z-Fold])
To display:
- [Classic Style]
- [Copy]
- [Finishing]
- [Fold/Bind]
- [Z-Fold]
- [Fold/Bind]
- [Finishing]
- [Copy]
Z-folds the long side of a copied sheet before feeding it out. This option is available when you print paper of 11 17 , 8-1/2 14 , A3 , B4 , or 8K . 8-1/2 14 is folded in two, not Z-folded.
To use this function, an option is required. For details on the required option, refer to Here.
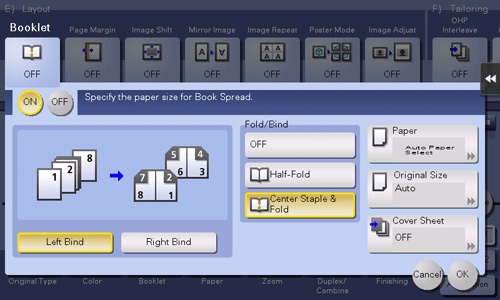
To copy in booklet format ([Booklet])
To display (Inch area):
- [Classic Style]
- [Copy]
- [Booklet]
- [Copy]
To display (Centimeter area): [Classic Style] - [Copy] - [Application] - [Layout] - [Booklet]
Sorts original data pages like a booklet and copies on both sides in spread. You can also specify the binding position, or insert front and back covers.
Setting | Description |
|---|---|
[ON]/[OFF] | Select [ON] to specify Booklet. |
[Left Bind]/[Right Bind] | Select the binding position of the copied sheets. |
[Fold/Bind] | Staples copy outputs in the center the paper or fold them in the center before discharging.
|
[Paper] | Select paper for copying. Select paper which corresponds to the size of a two-page spread of the booklet. |
[Original Size] | When the size of the original is not detected correctly, specify the size of the original you want to scan. If the machine cannot detect the size of irregular sized originals or photos, manually specify the size. |
[Cover Sheet] | Specify this option to insert a different sheet of paper from text pages as the front cover of a booklet.
|
The option is required to use [Fold/Bind]. For details on the required option, refer to Here.

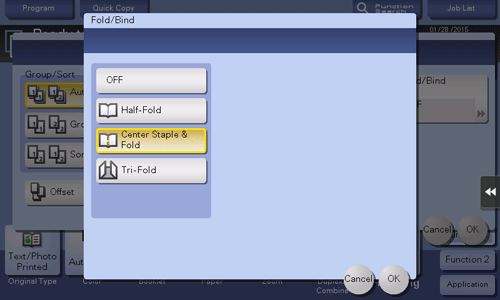
To bind in the center of the paper ([Center Staple & Fold])
To display:
- [Classic Style]
- [Copy]
- [Finishing]
- [Fold/Bind]
- [Center Staple & Fold]
- [Fold/Bind]
- [Finishing]
- [Copy]
Staples and feeds out a copied sheet by folding it in two.
To use this function, an option is required. For details on the required option, refer to Here.
If Center Staple is enabled, [Booklet] is set to [ON] automatically.
To output separately by set ([Group/Sort])
To display:
- [Classic Style]
- [Copy]
- [Finishing]
- [Group/Sort]
- [Finishing]
- [Copy]
Select the output method when making multiple copies.
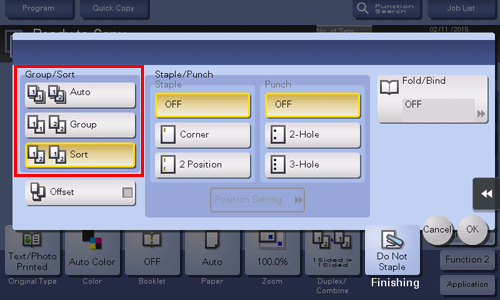
Setting | Description |
|---|---|
[Auto] | Automatically switches between Sort and Group according to the number of printed sheets for each set, and feeds out. If the number of printed sheets for each set is 1, the Group function is applied. If the number is 2 or larger, the Sort function is applied. |
[Group] | Feeds out copies separately page by page, for example: "111", "222", "333", "444", and "555". |
[Sort] | Feeds out copies separately one by one, for example: "12345", "12345", and "12345". |
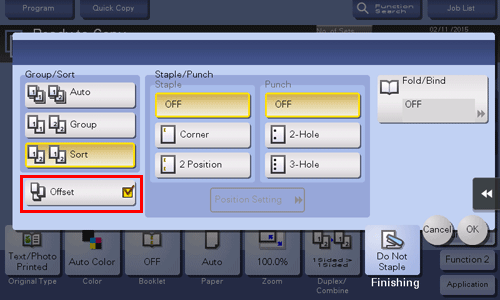
To output by page number or by set ([Offset])
To display:
- [Classic Style]
- [Copy]
- [Finishing]
- [Offset]
- [Finishing]
- [Copy]
Select this item when sorting by copies or by page to feed out paper.
If the Finisher or Job Separator is installed, the copies are fed out and stacked on top of each other with each copy or page set staggered to separate them.
If the Finisher or Job Separator is not installed, printed copies are fed out and sorted in an alternating crisscross pattern when the following conditions are satisfied.
8-1/2 11, A4, or B5 paper is used
Loading paper of the same size and type in the and directions
Specifying Auto Paper for the paper size setting