
Advanced Options Window
You can set the printer's advanced functions.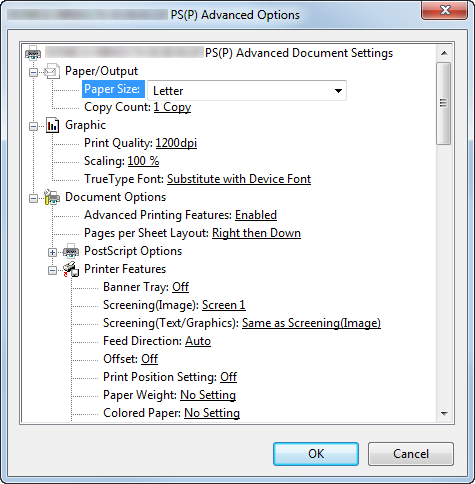
Function | Option | Description |
|---|---|---|
Paper Size | All paper sizes available in this machine | Set a paper size. |
Copies | 1 to 9999 | Specify the number of copies. This option may not be displayed depending on the application you are using. |
Print Quality | 600dpi, 1200dpi | Set a resolution. |
Scaling | 1% to 1000% | Set an enlarge or reduce ratio. |
TrueType Font | Substitute with Device Font, Download as Softfont | Set an output method of a TrueType font. |
Advanced Printing Features | Enabled, Disabled | Set this to enable the Pages per Sheet Layout function. |
Pages per Sheet Layout | Right then Down, Down then Right, Left then Down, Down then Left | Set this to enable the Pages per Sheet Layout function. |
PostScript Options | Optimize for Speed, Optimize for Portability, Encapsulated PostScript (EPS), Archive Format | Set an output option for PostScript. For details, refer to the PostScript guide. |
TrueType Font Download Option | Automatic, Outline, Bitmap, Native TrueType | Set an download option for a TrueType font. |
PostScript Language Level | 1 to 3 | Set a PostScript language level. |
Send PostScript Error Handler | Yes, No | Set whether to send a PostScript error handler or not. |
Mirrored Output | Yes, No | Set Mirrored Output. |
Negative Output | Yes, No | Set Negative Output. |
Banner Tray | Off, Auto, Tray 1, Tray 2, Tray 3, Tray 4, Tray 5, Tray 6, Tray 7, Tray 8, Tray 9, Tray 10, Tray 11, Feeder | Select a tray to print banner pages. |
Screening (Image) | Screen 1, Screen 2, Stochastic | Selects screen group set for image object. Screen type set in Custom Screen(*) on Control Panel of main body is assigned for the selected screen group. Also, image reproducibility changes by screens. Select a screen suitable for the required image quality.
|
Screening (Text/Graphics) | Screen1, Screen2, Same as Screening(Image) | Selects screen group set for text and graphic object. Screen type set in Custom Screen(*) on Control Panel of main body is assigned for the selected screen group. Also, text and graphic reproducibility changes by screens. Select a screen suitable for the required image quality.
|
Feed Direction | Auto, Long Edge, Short Edge | Set a direction to feed paper. |
Offset | Off, On | Stagger after each set of copies specified. |
Print Position Setting | Off, Left, Center, Right | Set the print position. |
Weight | No Setting, 40-49 g/m2, 50-54 g/m2, 55-61 g/m2, 62-74 g/m2, 75-80 g/m2, 81-91 g/m2, 92-105 g/m2, 106-135 g/m2, 136-162 g/m2, 163-216 g/m2, 217-256 g/m2, 257-300 g/m2, 301-350 g/m2, (When the weight unit is g/m2) | Set weight of print paper. |
Colored Paper | No Setting, White, Transparency, Blue, Goldenrod, Gray, Green, Ivory, Orange, Pink, Red, Yellow, Cream, Other, User Color | Set the color of print paper. |
Pre-Punched | Off, On | Set this to print on pre-punched paper. |
Output Tray | Default, Open Stacker Main Tray, Stapler Main Tray, Stapler Sub Tray, Large Capacity Stacker Auto, Stacker 1 Main Tray, Stacker 1 Sub Tray, Stacker 2 Main Tray, Stacker 2 Sub Tray, Stacker 3 Main Tray, Stacker 3 Sub Tray, Saddle-Stitcher Sub Tray, Multi Folder Main Tray, Multi Folder Sub Tray, Perfect Binder Sub Tray, External Finisher(Middle), External Finisher(End), Relay Unit 3A Sub Tray, Relay Unit 3B Sub Tray | Select an output tray. |
External Finisher(Middle), External Finisher(End) | Off, On | Select this option to use the External Finisher. |
Output Order | Face Down, Face Up | Set this to output printed paper with its face up. |
N to 1 | Off, On, No Setting | Set this to print an original in a reverse order. |
Pile Permission | Off, On | When selected On, other jobs can be printed and are permitted to be piled up on the large capacity stacker. When turned Off, the next job cannot be printed until the current job is removed from the large capacity stacker. |
Binding Position | Left Bind, Top Bind, Right Bind, Left Bind (Landscape), Top Bind (Landscape), Right Bind (Landscape) | Set a position to bind when using a function such as Staple and Punch. |
Print Type | 1-Sided, 2-Sided | Set this to perform 2-sided printing. |
Imposition | Off, Booklet, Adhesive Binding, 2 in 1, 2 Repeat, 2 Repeat Reversal (Left), 2 Repeat Reversal (Right), 2 Repeat Reversal (Top), 2 Repeat Reversal (Bottom), 4 Repeat, 4 in 1 (Vertical), 4 in 1 (Horizontal), 8 Repeat | Set this to perform an imposition printing. |
Book Spread | Off, On | Set this to perform book spread printing from mixed sized originals in the case of Booklet or Adhesive Binding. |
Staple | Off, Left Corner, Right Corner, 2 Positions (Wide), 2 Positions (Narrow), 2 Positions (Narrow+) | Set this when stapling. |
Punch | Off, 2-Hole, 3-Hole, 4-Hole, Multi Punch, Double Multi Punch | Set this to punch paper. |
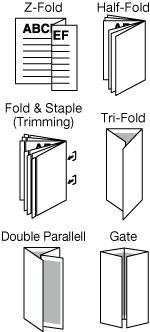
Fold | Off, Z-Fold, Fold and Staple, Fold & Staple + Trim, Half-Fold - Inside, Half-Fold - Outside, Tri-Fold-In - Inside, Tri-Fold-In - Outside, Tri-Fold-Out - Inside, Tri-Fold-Out - Outside, Double Parallel-Fold - Inside, Double Parallel-Fold - Outside, Gate-Fold - Inside, Gate-Fold - Outside, Multi Tri-Fold - Inside, Multi Tri-Fold - Outside, Multi Half-Fold - Inside, Multi Half-Fold - Inside+Trim, Multi Half-Fold - Outside, Multi Half-Fold - Outside+Trim | Set the fold function. |
Spine Corner Forming | Off, On | Applies pressure to the spine cover of the booklet processed by Fold & Staple to perform spine corner forming. |
Spine Corner Forming Strength | Weak+, Weak, Normal, Strong, Strong+ | Specify the spine corner forming strength. |
Crease | Off, 1 Piece, 2 Pieces | Creases for paper folding are made to prevent toner from peeling when paper is being folded. |
Image Shift | Off, On | Select whether to use image shift. |
180° Rotate | Off, On | Rotate the image 180 degrees to make prints. |
Front Cover | Off, Print, Blank | Set this to add a front cover. |
Front Cover Tray | Off, Tray 1, Tray 2, Tray 3, Tray 4, Tray 5, Tray 6, Tray 7, Tray 8, Tray 9, Tray 10, Tray 11, Feeder | Select a tray for a front cover. |
Back Cover | Off, Print, Blank | Set this to add a back cover. |
Back Cover Tray | Off, Tray 1, Tray 2, Tray 3, Tray 4, Tray 5, Tray 6, Tray 7, Tray 8, Tray 9, Tray 10, Tray 11, Feeder | Select a tray for a back cover. |
PI Front Cover Tray | Off, PI Tray 1, PI Tray 2, PI-PFU Tray 1, PI-PFU Tray 2, PI-PFU Tray 3 | Set this to print a front cover on paper that is different with the output paper, such as thick paper. |
PI Back Cover Tray | Off, PI Tray 1, PI Tray 2, PI-PFU Tray 1, PI-PFU Tray 2, PI-PFU Tray 3 | Set this to print a back cover on paper that is different with the output paper, such as thick paper. |
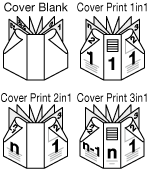
Perfect Binding Settings | Off, Cover Blank, Cover Print 1in1, Cover Print 2in1, Cover Print 3in1 | Select a cover tray for a perfect binder. |
Perfect Binding Cover Tray | Off, Tray 1, Tray 2, Tray 3, Tray 4, Tray 5, Tray 6, Tray 7, Tray 8, Tray 9, Tray 10, Tray 11, Feeder, PI Tray 1, PI Tray 2, PI-PFU Tray 1, PI-PFU Tray 2, PI-PFU Tray 3, PB Cover Tray | Select a cover tray for a perfect binder. |
Perfect Binding Cover Duplex | Off, On | Set this when printing a 2-sided cover for a perfect binder. |
Perfect Binding Cover Trim | Off, On | Set this when trimming a cover for a perfect binder. |
Perfect Binding Cover Crease | Off, Spine, Gutter, Spine + Gutter | Creases for paper folding are made to prevent toner from peeling when paper is being folded. |
Ring Binding | Off, On | Set this to bind the printed paper using ring-shaped binder. |
Printed Side for Top Sheet | Outside Print, Inside Print | Specify the printed side of the top sheet when the Ring Binding is set. |
Printed Side for Last Sheet | Inside Print, Outside Print | Specify the printed side of the last sheet when the Ring Binding is set. |
Print Mode | Print, Wait Mode, Proof Print, Proof Print (1st Sheet), Hold Job, Hold Job and Print, Spool | Specify the printing method. When Print is selected, the print job is printed without being stored on any HDD. When Wait Mode is selected, the print job is saved as an output-reserved job. To output such a print job, press Start on the control panel of this machine. When Proof Print is selected, the print job is printed only partially, and you can view the print image. This function is helpful for sample printing. When Proof Print (1st Sheet) is selected, the print job is printed only by the top page, and you can view the print image. This function is helpful for sample printing. When Hold Job is selected, the print job is held on this machine. When Hold Job and Print is selected, the print job is held on this machine while it is being printed. When Spool is selected, the print job is held in the HDD of the machine, and then printed. For details about Hold Job and Hold Job and Print, refer to Holding Job. |
Smoothing | Off, On | When turned On, you can smoothly print the outline of text with density of 100%, such as K=100%, and line images. |
Thinning | Off, On | Select this to control the boldness of the text or line images. This setting also has an effect on white characters on a colored background. |
Emphasis | Off, On | Set this to enable the outline emphasizing function. |
Outline Settings | Off, Text/Graphics, Text/Graphics/Image | The outline of text in gray and figures are printed sharply. |
1 Dot Line Emphasis | Off, On | Select this to emphasis an ultrafine line. |
Image Density Selection | Standard, +1, -10, -9, -8, -7, -6, -5, -4, -3, -2, -1, Toner Save, Draft Print | Select the print density. Move the slider toward plus to deepen the density and move the slider toward minus to lighten the density. |
Use CIE Color | Off, On, Default | Select this when using a CIE color space at printing in gray scale. When Use CIE Color is turned On, the gradation will be better than usual since the printing is processed via the color space defined by CIE, the International Commission on Illumination. However, it may require more time to print. |
Auto Image Adjustment | Off, Position/Gradation, Position | Performs the automatic image adjustment depending on the setting you selected when printing. |
Date/Time | Off, All Pages, 1st Page Only | Set this to print the date and time. |
Font | Gothic 8 pt to 14 pt Ming 8 pt to 14 pt | Set the font to print Date/Time. |
Position | Upper Left, Mid Left, Lower Left, Upper Mid, Mid, Lower Mid, Upper Right, Mid Right, Lower Right | Set the position to print Date/Time. |
Date | '10/11/23, Nov 23,2010, 11/23/'10, 23 Nov,2010, 23/11/'10 | Set a notation for Date. |
Time | Off, 1:23PM, 13:23 | Set a notation for Time. |
Copy Protect | Off, On | Select this option to use Copy Protect. |
Preset Stamp | Copy, Invalid, Illegal Copy, Invalid Copy | Select a preset stamp. |
Back Pattern | Cherry Blossoms, Arabesque, Lattice | Select a background pattern. |
Tandem Mode | Off, On | When printing multiple copies of a document, connect two printers in parallel to divide copies for printing. This function reduces the time required for printing when you want to print a large number of copies.
|
Color Bar | Off, Left, Top, Right, Bottom, Image Controller Default | Set a print position for Color Bar. |
Color Settings Information | Off, Left, Top, Right, Bottom, Image Controller Default | Set the print position for Color Settings Information. |
Number of Lines | 1 Line - 5 Lines | Set the number of lines for Color Settings Information. |
Printed Items - Date/Time | Off, On | Prints the date and time when printing was executed in Color Settings Information. |
Printed Items - Job Name | Off, On | Prints the name of the currently executed print job in Color Settings Information. |
Printed Items - User Name | Off, On | Prints the name of the user who printed a job in Color Settings Information |
Printed Items -Printer Name/Model Name | Off, On | Prints the machine name and model name in Color Settings Information. |
Printed Items - ROM Version | Off, On | Prints the ROM version of the image controller in Color Settings Information. |
Printed Items - Tone Curve Name | Off, On | Prints the currently used tone curve name, in Color Settings Information. |
Printed Items - Screening | Off, On | Prints the currently used screen setting, in Color Settings Information. |
Printed Items - Use CIE Color | Off, On | Uses a CIE color space. When Use CIE Color is turned on, the printing is processed via the color space defined by CIE, an international commission on illumination. Although the quality in reproducing the gradation will be better than usual, it may require more time to print. |
Printed Items - Comment | Off, On | A comment can be printed for up to 200 characters in Color Settings Information. However, printing may be cut off depending on the number of printed pages or the number of lines. |
Printed Items - Character Size | 4pt to 36pt | Specify the print font size in Color Settings Information. |
*Quality Adjustment can be set from Utility Menu by selecting Administrator Setting - System Setting - Expert Adjustment - Quality Adjustment - Custom Screen.
Tips
In PostScript Custom Page Size of Paper Size, you can specify up to
Width: 94.9 mm to 313.97 mm
Height: 133.0 mm to 483.0 mm.
You can specify up to the range above.
In PostScript Custom Page Size (Custom Size), you cannot specify the paper size as a Custom Size depending on the mounted Feeding option.
For details about available sizes, refer to Paper Size Available for Use or contact your service representative.The Staple function is available only when an optional stapler is mounted.
The widths between 2 Positions that can be set are as follows.
Wide Approx. 165 mm / 6.50"
Narrow Approx. 140 mm / 5.51"
Narrow+ Approx. 120 mm / 4.72"The Punch function is available when an optional Punch Kit, Multi Folder, or Multi Hole Punch Unit is mounted.
The Fold function is available only when the optional Multi Folder, Stapler, and Saddle Kit are mounted.
The Ring Binding, Printed Side for Top Sheet, and Printed Side for Last Sheet functions are available only when an optional Ring Binder is mounted.
When Printed Items - Comment is set to On, it will print the comment that is configurable in Color Default Settings in Color Centro. For details, refer to Color Default Settings Screen.
Image, Text, and Graphics displayed in the Advanced Options screen are available for:
Image………Image
Text………Text
Graphics……Figures and linesAuto Image Adjustment is available when Integrated Color Care Unit IQ-501 is mounted on the machine.
Reference
For details about the paper sizes that can be loaded in the tray, refer to Paper Size Available for Use.