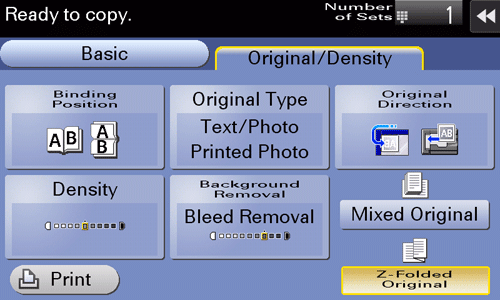
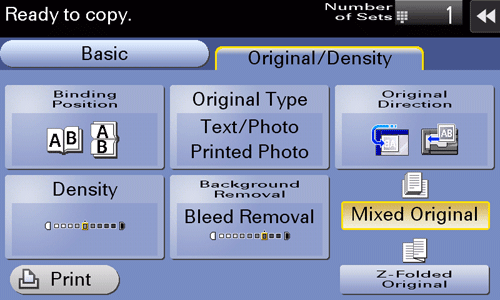
Copy Settings ([Original/Density])
- Specifying the original binding position (Binding Position)
- Selecting the appropriate image quality level for the original (Original Type)
- Specifying the original loading direction (Original Direction)
- Adjusting the copy density (Density)
- Adjusting the background density of the original to be scanned (Background Removal)
- Scanning originals of different sizes (Mixed Original)
- Scanning originals with folds (Z-Folded Original)
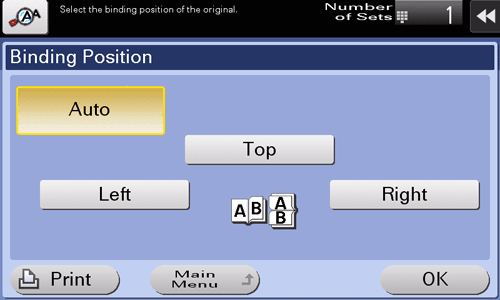
Specifying the original binding position ([Binding Position])
Specify the binding position to suit the orientation of the target original.
Tap [Original/Density] - [Binding Position].
Setting
Description
[Auto]
Automatically configures the binding position of the original.
When the long side of the original is 11-11/16 inches (297 mm) or less, the binding position is set to the long side of the paper.
When the long side of the original exceeds 11-11/16 inches (297 mm), the binding position is set to the short side of the paper.
[Top]
Select this option when the binding position is set to the top of the original.
[Left]
Select this option when the binding position is set to the left of the original.
[Right]
Select this option when the binding position is set to the right of the original.
Selecting the appropriate image quality level for the original ([Original Type])
Select the optimum settings for the original to copy it at the optimum image quality.
Tap [Original/Density] - [Original Type].
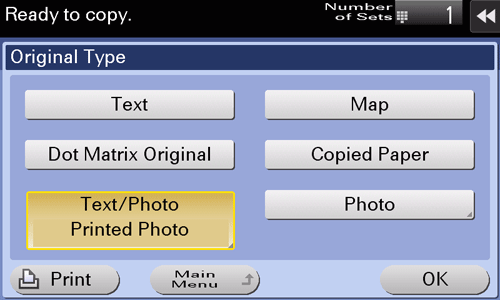
Setting
Description
[Text]
Copies an original, which consists primarily of text, at the optimum image quality level.
This function sharpens the edges of each character, creating easy-to-read images.
[Map]
Copies an original that has a colored background such as a map or that has been drawn by pencil or colored thin line, at the optimum level of image quality.
A sharp copy image is produced.
[Dot Matrix Original]
Copies an original, that primarily consists of text such as thin or faint characters, at the optimum image quality level.
This function reproduces text using high pixel density, creating easy-to-read text.
[Copied Paper]
Copies the original, which is output with an even density from the copier or printer, at the optimum image quality level.
[Text/Photo]
Copies the original, which consists of text and photos, at the optimum level of image quality.
This function sharpens the edges of each character and reproduces smoother photos.
[Photo Paper]: Select this option to scan an original that contains photos printed on photographic paper.
[Printed Photo]: Select this option to scan the printed original such as a brochure or catalog.
[Photo]
Copies an original consisting only of photos at the optimum image quality level.
[Photo Paper]: Select this option to scan an original printed on photographic paper.
[Printed Photo]: Select this option to scan the printed original such as a brochure or catalog.
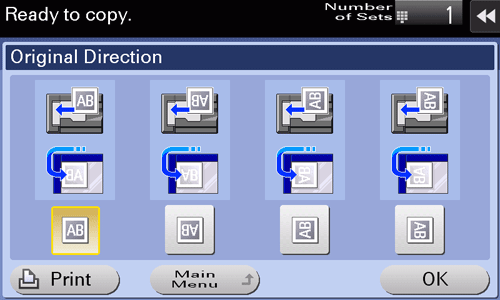
Specifying the original loading direction ([Original Direction])
When scanning a 2-sided original, specify the original loading direction so that the vertical direction of the scanned original is set correctly.
Tap [Original/Density] - [Original Direction], and specify the original loading direction.
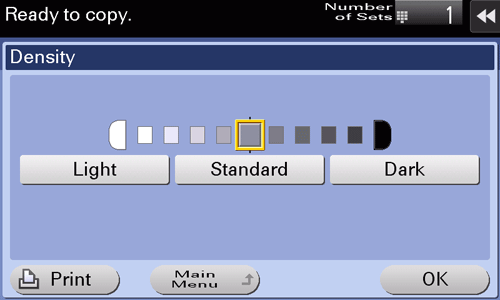
Adjusting the copy density ([Density])
Adjust the density of a copy image.
Tap [Original/Density] - [Density] to adjust the density.
Adjusting the background density of the original to be scanned ([Background Removal])
Adjust the density of the background area when copying originals with colored background (newsprints, recycle paper, etc.) or originals that are so thin that text or images on the back would be scanned.
Tap [Original/Density] - [Background Removal].
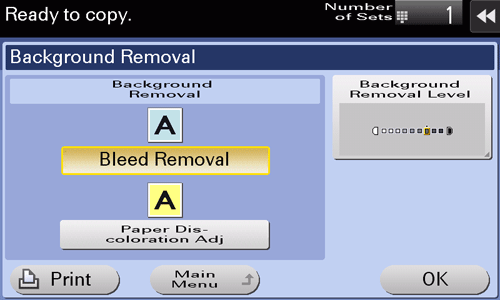
Setting
Description
[Background Removal]
Copies a thin 2-sided original or an original with a colored background, at the optimum image quality level.
[Bleed Removal]: Select this option to prevent bleeding of the back of the paper when printing a 2-sided original that is so thin that the contents of the back side would be scanned.
[Paper Discoloration Adj]: Select this option to scan an original with a colored background such as a map.
[Bkgd. Removal Level]
Adjusts the density of the background color for an original with a colored background. If [Auto] is selected, the density of the background color is determined automatically, and the original is copied at the optimal background density level.
Scanning originals of different sizes ([Mixed Original])
Even for an original with pages of different sizes, by using the ADF, you can scan data while detecting the size of each page.

Load all the original pages into the ADF so that the tops of the pages are at the back or left side of the machine.
Tap [Original/Density] - [Mixed Original].
Scanning originals with folds ([Z-Folded Original])
If a folded original is loaded into the ADF, the original size may not be able be detected accurately. When [Z-Folded Original] is specified, the original size can be accurately detected even for the folded original sheets.
Unfold the folded original sheets before loading them into the ADF. If a folded original is not unfolded before scanning, a paper jam may occur or the size may not be correctly detected.
Tap [Original/Density] - [Z-Folded Original].